4 Battery 24 Volt Wiring Diagram: Master Your Power Setup!
Are you looking to enhance your power setup with a reliable 24-volt battery system? Whether you're powering a recreational vehicle, a solar energy system, or an off-grid application, understanding the intricacies of a 4 battery 24-volt wiring diagram is essential. In this blog post, we'll break down the essential components and connections needed to master your power configuration. With clear instructions and helpful tips, you'll be well on your way to optimizing your energy system for efficiency and performance. Let's dive into the world of battery wiring and unlock the potential of your 24-volt setup!
4 Battery 24 Volt Wiring Diagram
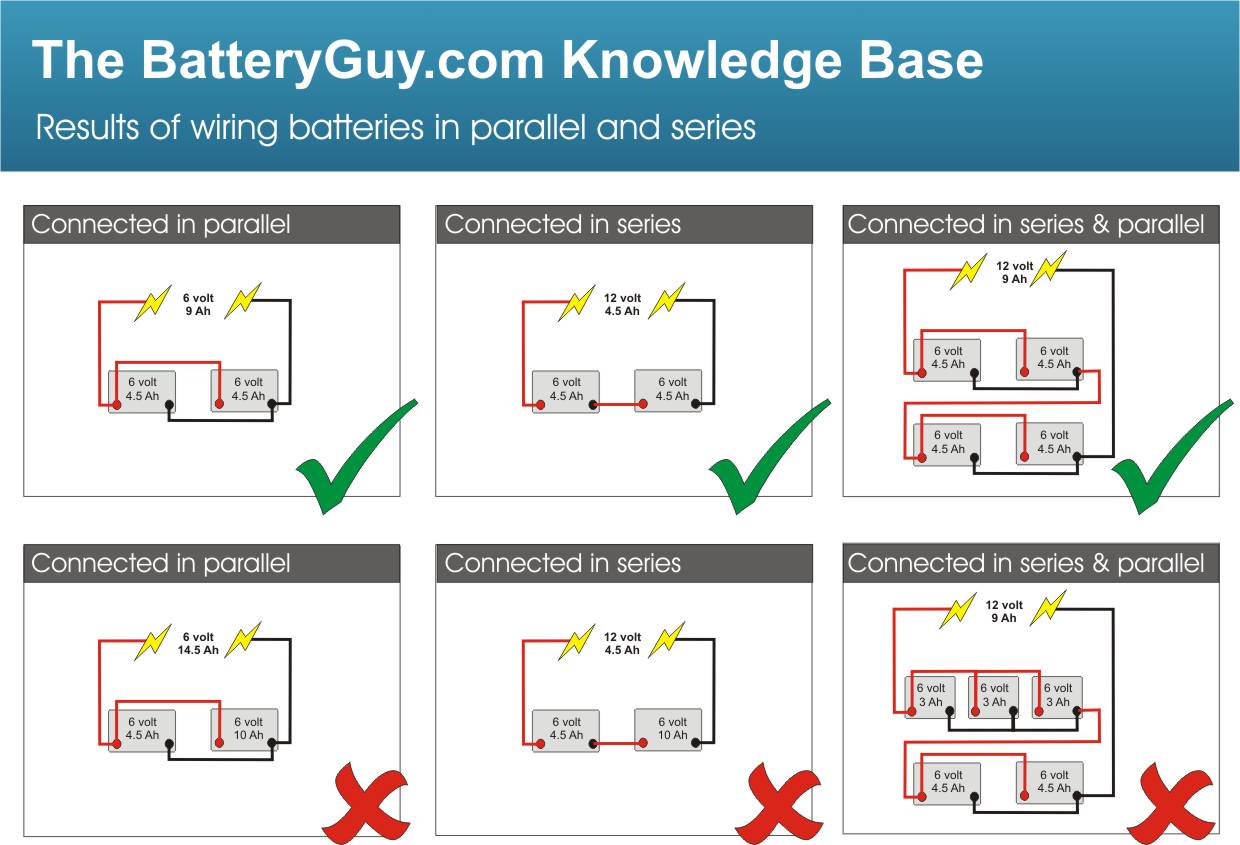
When it comes to setting up a reliable power system, understanding a 4 battery 24 volt wiring diagram is essential for maximizing efficiency and ensuring safety. This configuration typically involves connecting four 6-volt batteries in series to achieve the desired voltage output. By linking the positive terminal of one battery to the negative terminal of the next, you create a seamless flow of electricity, resulting in a robust 24-volt system. Additionally, it's crucial to pay attention to the gauge of the wiring and the quality of the connections to prevent voltage drops and potential hazards. Whether you're powering an RV, solar system, or electric vehicle, mastering this wiring diagram will empower you to harness your power setup effectively!
 cothread.blogspot.com
 Wiring 24 Volt Battery Diagram
When setting up a 24-volt battery system, understanding the wiring diagram is crucial for ensuring optimal performance and safety. A typical 4 battery 24-volt wiring diagram involves connecting two pairs of 12-volt batteries in series to achieve the desired voltage. Each pair of batteries is wired positive to negative, creating a 24-volt output. The diagram will illustrate how to connect the batteries to a power inverter or other devices, ensuring that the positive terminal of one battery connects to the negative terminal of the next. Additionally, proper grounding and fusing are essential to protect your system from overloads. By mastering this wiring configuration, you can efficiently harness the power of your batteries for various applications, from RVs to solar setups.
 circuitengineuntrim77.z4.web.core.windows.net
 The Ultimate Guide To Understanding 2 Battery 24 Volt Wiring Diagrams
When it comes to optimizing your power setup, understanding 2 battery 24 volt wiring diagrams is crucial for efficiency and safety. This ultimate guide will walk you through the intricacies of wiring two 12-volt batteries in series to achieve a robust 24-volt system. Whether you're powering an RV, a solar setup, or any other application requiring a reliable power source, mastering these diagrams will empower you to make informed decisions about your electrical configurations. We'll break down the essential components, highlight common mistakes to avoid, and provide visual aids to ensure that you can confidently tackle your wiring project. Dive in and unlock the full potential of your 24-volt system!
 elecschem.com
 4 Battery 24 Volt Wiring Diagram
When it comes to setting up a reliable power system, understanding a 4 battery 24 volt wiring diagram is essential for maximizing efficiency and ensuring safety. This configuration typically involves connecting four 6-volt batteries in series to achieve the desired voltage output. By linking the positive terminal of one battery to the negative terminal of the next, you create a seamless flow of electricity, resulting in a robust 24-volt system. Additionally, it's crucial to pay attention to the gauge of the wiring and the quality of the connections to prevent voltage drops and potential hazards. Whether you're powering an RV, solar system, or electric vehicle, mastering this wiring diagram will empower you to harness your power setup effectively!
 scheme360.net
 Wiring Diagram For 12 24 Volt Trolling Motor
When it comes to optimizing your power setup for a 12/24 volt trolling motor, a clear and precise wiring diagram is essential. This diagram not only simplifies the installation process but also ensures that your motor operates efficiently and safely. By connecting two 12-volt batteries in series, you can achieve the desired 24 volts needed for your trolling motor. The wiring diagram will guide you through the correct connections, showing how to link the positive terminal of one battery to the negative terminal of the other, while the remaining terminals connect to the motor. Mastering this wiring setup not only enhances your boating experience but also maximizes the longevity and performance of your trolling motor, making your time on the water more enjoyable.
 mungfali.com
 Other Wiring Gallery
circuitengineuntrim77.z4.web.core.windows.net
Wiring Two 12 Volt Batteries In Parallel
circuitdiagramtids.z21.web.core.windows.net
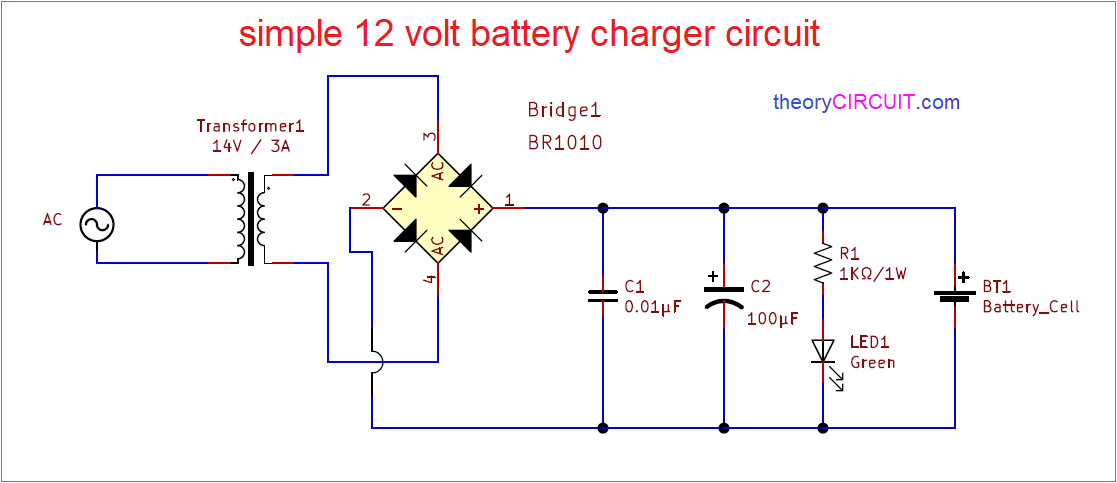
Free Battery Charger Circuit Diagram

guidejachek4x.z21.web.core.windows.net
Wiring Two 12 Volt Batteries In Parallel
scheme360.net
4 Battery 24 Volt Wiring Diagram

stewart-switch.com
2 Battery 24 Volt Wiring Diagram

www.wiringview.com
4 Battery 24 Volt Wiring Diagram

www.wiringview.com
4 Battery 24 Volt Wiring Diagram

www.wiringview.com
You Might Also Like: Nissan Vanette C22 Wiring Diagram
4 Battery 24 Volt Wiring Diagram